Let's build react.js
Recently React is growing to become the de facto standard for web components. And it is also pretty straight forward to learn and use React.
I recommand to start with the official website for documentations, also some examples on github and Todomvc
However, for people already know how to write React, they might still wondering why React is built in a certain way, like React DOM, state, how React update and manipulate the DOM elements.
For those who are curious, this article is going to rebuild React from scratch and create a workable basic React-like framework, by going through the logics in React source code. I hope you can understand how React works after reading this post.
I recommand you can also checkout the code example from github, each section is tagged by step 1-9, you can follow the code example to see how the code evolves with test cases.
Let’s write React component!
First, let’s create a simple react example:
In this component, We create the virtual DOM with ReactDOM but not jsx, render the DOM into container, and handle a click event to update the text and state with current timestamp.
Right now, we are going to take out the React framework, and write some code to make this work.
So… Let’s Build React.js!! (React.jsを作ってみましょう!!)
Let’s build React Element!
Before building element, we need to understand the difference between React Element and React Component
React Element is data. Includes content type, property and child elements. Content type includes React DOM or React Class, React DOM is usually what we can find in render() method, React Class is the custom class that we wrote for application logic.
React Component is an instance. It contains element, render React DOM element to html, handle events, manage state and update DOM when state changes.
1 | var ReactElement = function(type, props) { |
We create a simple ReactElement that holds the element type and properties. Also a createElement method that creates element by the type, properties and children.
With this createElement method, we can start to build ReactDOM.
Let’s build React DOM!
React DOM is a ReactElement with tag name as type, for example, a div element has ‘div’ as element type. We can create a DOM factory using javascript’s bind method:
1 | var DOM = {}; |
With React.DOM, we can build DOM tree with those factory methods:
1 | DOM.div(null, [ |
React DOM is the virtual DOM that represent the structure of DOM elements, because of the Virtual DOM, React can update only neccessary part when the structure or data changed on application.
Next we will create React Components to manage those Virtual DOM.
Let’s build React Component!
React has 3 kinds of Components (basically) :
- TextComponent: render text content.
- DOMComponent: render tag and it’s child elements.
- CompositeComponent: custom react component with React Class, which includes all application logics. It is the component we saw in example.
Each kind of component holds different element. A factory method ‘instantiateReactComponent’ will take element and create component by element types:
1 | var ReactDOMTextComponent = function(text) { |
Let’s create React Class!
Class is the building block for React. A class define an interface for CompositeComponent to interact with application logics.
includes methods like render, setState, render, getInitialState and other custom methods. Also holds the state of the component.
1 | function createClass(spec) { |
In here, createClass method returns constructor function for class, includes get initial states and set setState method, also inherit methods from spec object.
The class instance will be created as ReactCompositeComponent when it got instantiated by React.render() method.
Also, the class takes an updater as attribute, which is a ReactUpdateQueue object in Real React that quque DOM update actions, detect difference and update DOM.
After we have class, elements and components, we can start to implement ‘mount’ function on component, which creates rendered element for React to mount on container.
Let’s mount React Component!
For text component, mount method is simple:
1 | ReactDOMTextComponent.prototype.mountComponent = function(rootID) { |
We wrap the content with <span> tag for text element, put rootID as a data attribute data-reactid which will be pretty important when we try to update it.
For composite element, we initialize the element class, call render() to get DOM tree, than mount the returned DOM.
1 | ReactCompositeComponent.prototype.mountComponent = function(rootID) { |
Mounting the DOM component is a complex one. First we generate element tag, attach property like class name, then iterate all child elements, instantiate and mount child components and pass along react ID to keep track the index of elements.
1 | ReactDOMComponent.prototype.mountComponent = function(rootID) { |
And mountComponent method returns rendered html from virtual DOM.
Let’s render React Component!
After we get all component rendered, we can put generated DOM onto the browser by calling React.render method.
In render method we take the top level element, create components, render and mount html to container.
1 | function render(element, container) { |
Now we have the rendered components display on screen, next step is to handle update and events.
Let’s getNode by ReactID!
Before we go to next step, we need to understand how ReactID works.
data-reactid is a custom data attribute that exists on every react generated DOM elements. usually in the form of ‘.0.1.2’. The dot is seperator, and number is the index of the element under parent
For example:
1 | <article> |
We set the article element with reactid .0, the next 2 div will inherit parant id .0 and have the subfix to present it’s index.
the first div under article element will have id .0.0, second div will have id .0.1. So the element Test3 will have id .0.1.2, which means is on the second layer from top element, 2nd element on first layer and 3rd element on second layer.
As the example with reactid:
1 | <article data-reactid=".0"> |
But what are those id for? React component actually does not hold the reference of generated DOM, so when the component state changed, we need to find the DOM element by getNode function with ReactID.
So let’s implement the getNode function:
1 | function getNode(targetID) { |
With the getNode function, the component can link to the mounted DOM element, update and detect event by reactid.
Let’s capture event!
So let’s talk about event
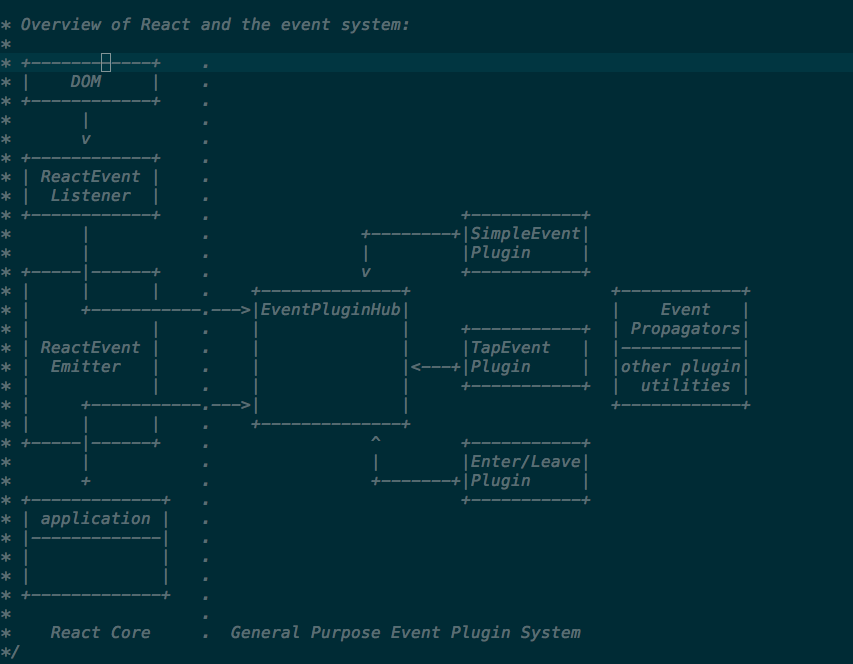
This is the architecture for React events. Basicaly react capture the bubbled event on top level, get the reactid from event target to identify which event listener to call.
This a a centralize structure to handle events. So there is no event attached to child DOM element, all listener are attached at top level. So we react update, it does not needs to keep tracks of event listeners.
And the EventPluginHub allow plugin to handle all propagated events.
So let’s start with ReactEventEmitter:
1 | var ReactEventEmitter = { |
This is a simplified version of event emitter, we can add the hook to React.render function to trap event at top level:
1 |
|
With this centralize event structure, React can manage all event listeners at one place, allow EventPlugin to plug and handle events.
Let’s update React Component!
Update component is triggered by receiveComponent function, which take another element (data) and component will rerender with minimal DOM manipulation.
When the component receive element, it will compare the element is different or not, if it is different, rerender element and child elements, mount new DOM html to replace old html on browser DOM tree.
On text component, it is pretty simple, the component will compare new element, which is text. If text is changed, find Node by reactid, and update itself to new text.
1 | ReactDOMTextComponent.prototype.receiveComponent = function(nextText) { |
On CompositeComponent, it will just call the child component with new element, which delegate to top level DOM component on virtual DOM.
1 | ReactCompositeComponent.prototype.receiveComponent = function(nextElement) { |
For DOM component, it will check all child components to see if any element changed, if so, then rerender the child elements.
DOM component compare element by shouldUpdateReactComponent function.
In this example we only compare the types, and only expect TextComponent to update itself. But in React it check the DOM structure change and remount the changed elements.
1 | ReactDOMComponent.prototype.receiveComponent = function(nextElement) { |
Here is the finished example:
This example simplified most of the complex logic in React, so if you are interested, go check the source code.
There is a lot of details about how React queue up DOM updates for performence. But I hope this example is enough to show the basics of how React works.
Comments